
To clean your toilet commode effectively, gather all necessary supplies, apply a suitable toilet cleaner, scrub every part thoroughly, and disinfect all surfaces. Do this in the correct order, and you will have a hygienic and sparkling-clean toilet every time.
Are you ready to begin with the detailed steps? Here goes.
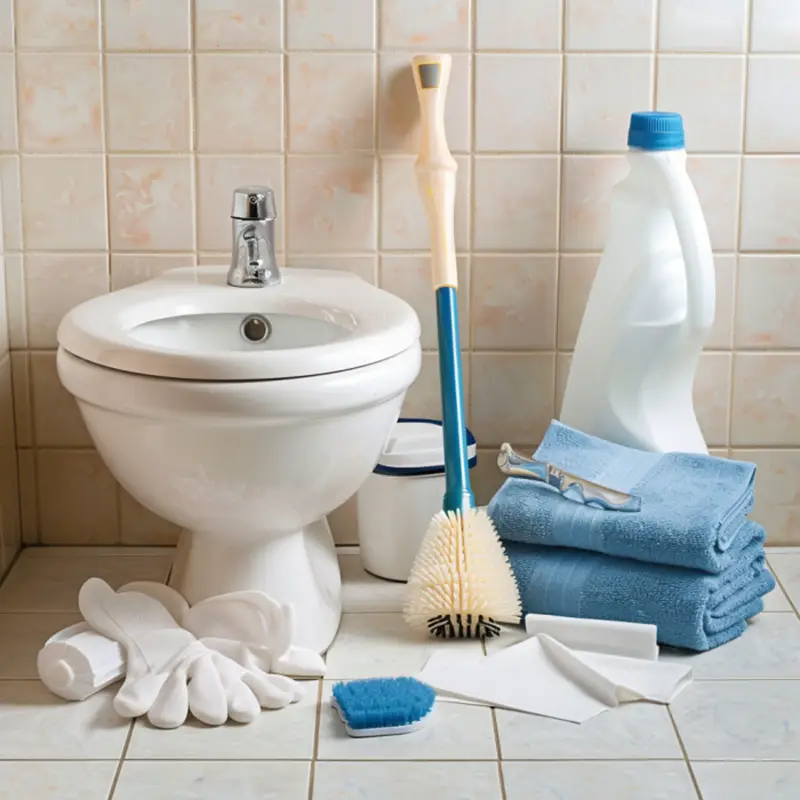
Gather Your Cleaning Supplies
It may sound clichéd, but I am telling you, this step is important (you’ll thank me later). Preparing the right cleaning supplies is the first step to an effective toilet cleaning routine. And you want to be effective, right? Having everything you need within reach will make the process smoother and more efficient.
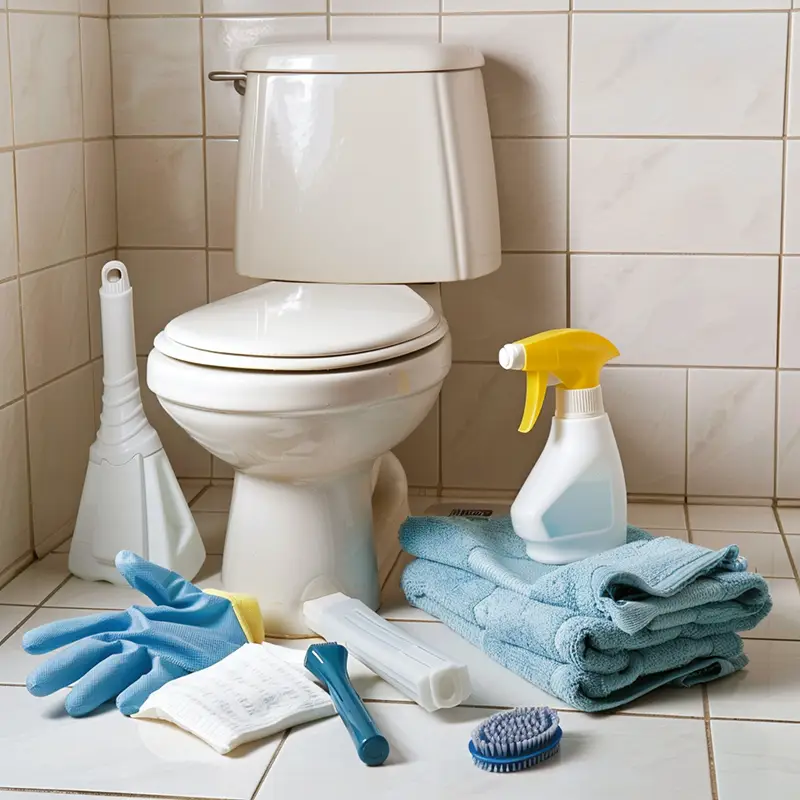
Essential Cleaning Agents
- Toilet Cleaner: Choose a toilet cleaner that is good at removing stains and kills germs. Products with bleach are popular for their disinfecting properties. I’d use cleaners with natural ingredients like vinegar or citric acid for a more eco-friendly cleaning product option.
- Disinfectant Spray: This is used for surfaces outside the bowl, such as the seat, lid, and handle. Make sure the disinfectant is strong enough to kill bacteria and viruses.
Tools and Equipment
- Toilet Brush: A sturdy, stiff-bristle brush is a must for scrubbing the inside of the bowl. Quick tip: brushes with bristles across the whole surface are more effective than those with bristles on just one side.
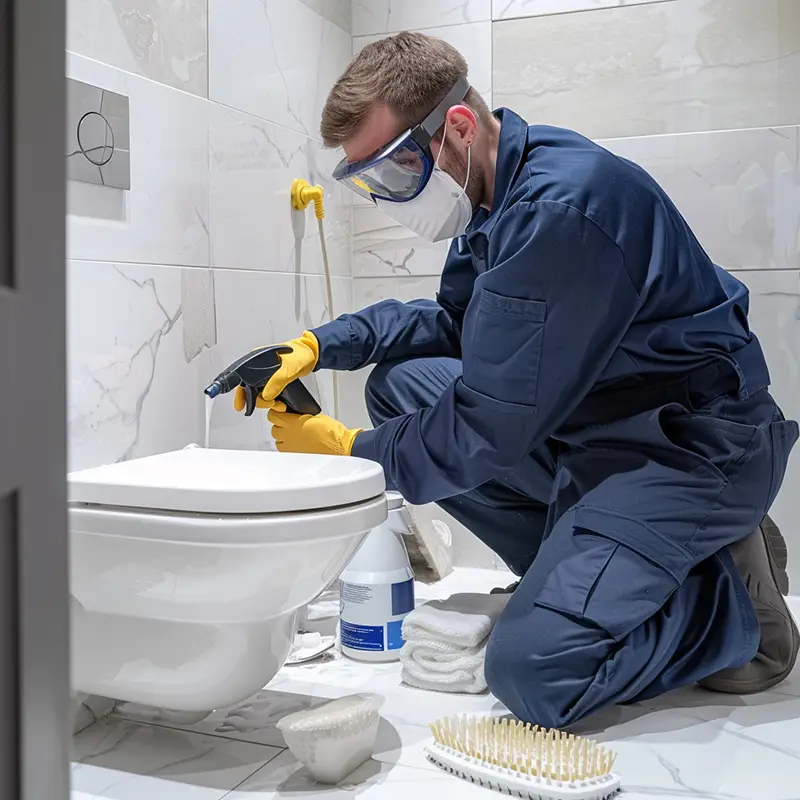
- Rubber Gloves: Wear rubber gloves to protect your hands from harsh chemicals and germs. They also give you a better grip on cleaning tools. (I don’t get it, why would anyone want to clean their toilet without gloves, duh?)
- Goggles: Safety goggles protect your eyes from splashes, especially when using strong chemical cleaners. (Yep, the goggles. I know. But I’d rather not get a nasty little bacteria in my eyes. It beats the embarrassment of looking like Walter White in the mirror, lol.)
- Paper Towels: Use these to wipe down surfaces. Paper towels are preferable as they can be disposed of after use, preventing the spread of germs.
- Spray Bottle: This is useful for mixing and applying homemade cleaning solutions, such as a mixture of water and vinegar.
Additional Cleaning Tools
- Old Toothbrush: Perfect for cleaning hard-to-reach areas like the hinges of the toilet seat and under the rim. Just remember not to put it back in the cup with the rest of them. You’ve been warned :^).
- Cleaning Rags: Use these to wipe down surfaces after spraying disinfectant. Microfibre cloths are especially effective because they trap dirt and bacteria.
- Bucket: If you need to scrub the floor around the toilet, a bucket filled with a disinfectant solution will be necessary. (Ahm, don’t try this step on your toilet carpet, lol. I would then instantly fire the question – why the heck did you put carpet in your toilet???)
- Mop: Use this to clean the bathroom floor after you finish cleaning the toilet. Ensure the mop is clean to avoid spreading dirt. (See my carpet advice above.))
Natural Cleaning Alternatives
- Baking Soda: This is a great alternative for those sensitive to chemicals. It can be used to scrub the bowl and other surfaces.
- Vinegar: When combined with baking soda, vinegar creates a powerful cleaning solution that tackles tough stains and disinfects the toilet.
You need to have all these supplies ready before you start. This will make your cleaning task more efficient and less stressful. Keep your cleaning supplies in a designated area, preferably in a caddy, so you can easily carry them from one bathroom to another if needed.
Start with a General Wipe-Down
A general wipe-down is crucial before going into deeper cleaning mode. This step removes surface dirt and prepares the toilet for thorough scrubbing.
Remove Visible Dirt and Dust
- Seat and Lid: Begin by lifting the seat and lid. Use paper towels to wipe down both sides of the seat and lid, removing dust, hair, and loose dirt.
- Tank: Wipe the top and sides of the tank. Dust and grime often accumulate here, especially if not cleaned regularly.
- Base: Don’t forget the base of the toilet. Use paper towels to clean around the bottom, where dust and dirt often settle.
Use Disinfectant Spray
- Spray All Surfaces: After removing the initial layer of dirt, spray disinfectant on all external surfaces, including the seat, lid, tank, and base.
- Let It Sit: Allow the disinfectant to sit for a minute. This is an important step. Let the chemical do its job. It kills germs and makes it easier to wipe away grime.
Wipe with Clean Paper Towels
- Thorough Wipe-Down: Use clean paper towels to wipe all the sprayed surfaces. Pay special attention to frequently touched areas, such as the handle and the front of the bowl.
- Replace Towels Frequently: Change paper towels often to avoid spreading germs. Dispose of used towels in a waste bin immediately.
Address Hard-to-Reach Areas
- Hinges and Crevices: Use an old toothbrush to scrub around the hinges and other hard-to-reach areas. Spray these spots with disinfectant first for better cleaning.
- Under the Seat: Lift the seat and clean the underside thoroughly. This area can harbour bacteria and grime.
OK, you’ve completed the stage I call The General Wipe Down. (I know, I am a sucker for operation names, right?) This general wipe-down prepares the toilet for the more intensive cleaning steps that follow.
Apply Toilet Cleaner

Another important step is applying the toilet cleaner correctly. If you want your toilet to be thoroughly cleaned and disinfected, you don’t want to mess this step up.
Flush to Wet the Bowl
Start by flushing the toilet to wet the interior of the bowl. This helps the cleaner adhere better to the surfaces and makes it more effective at breaking down stains and grime.
Apply Cleaner Under the Rim
- Target the Rim: Lift the toilet seat and apply the cleaner under the rim. The rim is a hotspot for bacteria and grime, so it needs a thorough application.
- Distribute Evenly: Squeeze the cleaner bottle gently as you move around the rim to ensure even distribution. You don’t need to cover the entire surface with a thick layer; a thin, even coating will suffice.
Apply Cleaner Around the Bowl
- Cover All Areas: After applying under the rim, squirt the cleaner around the sides of the bowl. Ensure you cover the entire surface, focusing on areas where stains are most visible.
- Let It Sit: Allow the cleaner to sit for at least five minutes. This dwell time is crucial for breaking down tough stains and killing germs.
Reach the Water Line and Drain
- Focus on Problem Areas: Pay special attention to the water line and the drain at the bottom of the bowl. These areas are prone to mineral deposits and grime build-up.
- Apply Extra Cleaner if Needed: If these areas are particularly dirty, apply a bit more cleaner to ensure they get a thorough clean.
Use a Targeted Nozzle
- Choose the Right Product: Some toilet cleaners have a targeted nozzle to reach under the rim and other tricky spots. These nozzles make it easier to apply the cleaner precisely where needed.
- Ensure Complete Coverage: Use the nozzle to ensure the cleaner reaches all parts of the bowl, including under the rim, down the sides, and into the drain.
This step ensures the cleaner has enough time to break down stains and disinfect the toilet bowl.
Scrub the Bowl
Time for some good old-fashioned elbow grease. Scrubbing the bowl is where the actual cleaning happens. This step is important for removing all the built-up grime and ensuring the toilet is hygienic.
Start Under the Rim
- Target Hidden Grime: Start scrubbing where dirt and bacteria often hide under the rim. Use a stiff-bristle brush to reach these areas effectively.
- Scrub Thoroughly: Move the brush in a circular motion to dislodge grime. Ensure you cover the entire circumference of the rim.
Move Down the Bowl
- Systematic Approach: After the rim, scrub the sides of the bowl. Use both up-and-down and circular motions to cover every inch.
- Water Line Focus: Pay special attention to the water line. This area is prone to mineral deposits and may require extra scrubbing.
Clean the Drain Area
- Deep Scrubbing: The drain at the bottom of the bowl can harbour significant grime. Scrub this area thoroughly to ensure all deposits are removed.
- Use Extra Cleaner if Needed: If stains persist, apply a bit of cleaner and let it sit for a few minutes before scrubbing again.
Check for Missed Spots
- Final Inspection: After scrubbing, inspect the bowl for any missed spots. Touch up these areas with additional scrubbing as needed.
- Use a Flashlight: If necessary, use a flashlight to check under the rim and other hidden spots.
Use Baking Soda for Stubborn Stains
- Apply Baking Soda: For tough stains, sprinkle baking soda in the bowl. It acts as an abrasive to help lift stains.
- Scrub Again: Use the toilet brush to scrub the baking soda into the stains. The combination of baking soda and cleaner can be very effective.
Investing time in good scrubbing pays its dividend. Your bowl areas are clean and free of grime.
Clean the Seat and Lid
Proper cleaning of the seat and lid is vital for maintaining a hygienic toilet. This part of the toilet directly contacts users (like yours truly), making thorough cleaning essential. I must always have an abso-friggin’-lutely spotless toilet seat surface under my behind. Otherwise, I get to scrubbing (even in the middle of the night).
Disinfecting the Seat and Lid
- Spray Disinfectant: Spray a generous amount of disinfectant on the top and bottom of the seat and lid. Pay attention to the areas where the seat attaches to the toilet, as these spots can harbour bacteria.
- Let It Sit: Allow the disinfectant to sit for a minute to kill germs effectively.
Wipe Down Thoroughly
- Use Clean Paper Towels: Wipe the seat and lid with clean paper towels. Replace the towels frequently to avoid spreading germs.
- Top and Bottom: Clean both sides of the seat and the lid thoroughly. The underside of the seat is often neglected but needs just as much attention as the top.
Scrub Hinges and Crevices
- Use an Old Toothbrush: The hinges and crevices where the seat attaches to the toilet can be tricky to clean. Use an old toothbrush to scrub these areas effectively.
- Apply Disinfectant: Spray disinfectant directly onto the toothbrush for better cleaning power. Scrub around the hinges and any small crevices to remove grime and bacteria.
Address Stubborn Stains
- Apply Extra Cleaner: If there are any stubborn stains on the seat or lid, apply a bit more cleaner directly to the stain.
- Scrub Gently: Gently scrub the stained area with a toothbrush (yep, the same one from earlier) or a soft cloth. Avoid using abrasive materials that could scratch the surface.
Final Wipe-Down
- Fresh Paper Towels: Use fresh paper towels for a final wipe-down after scrubbing. This removes all cleaner residues, leaving the seat and lid hygienically clean.
- Check for Missed Spots: Inspect the seat and lid for any areas that may have been missed. Wipe these spots down to ensure thorough cleaning.
Clean the Exterior
This toilet part is often touched and can harbour germs and dust. Don’t cut corners and start cleaning. Here’s how..
Wipe Down the Tank
- Top and Sides: Wipe the tank’s top and sides with paper towels or a cleaning rag. Dust and grime often accumulate here.
- Disinfectant Spray: Spray the tank with disinfectant and let it sit for a minute. This will kill germs and make it easier to wipe away dirt.
Clean the Handle
- High-Touch Area: The handle is a high-touch area that needs regular cleaning. Spray disinfectant on the handle and wipe it down thoroughly.
- Use a Toothbrush: If the handle has grooves or crevices, use an old toothbrush to scrub these areas effectively.
Wipe the Exterior Bowl
- Spray and Wipe: Spray disinfectant on the bowl’s exterior, including the sides and base. Use paper towels or a cleaning rag to wipe it down.
- Focus on the Base: Pay special attention to the toilet’s base, where dust and grime can accumulate. Clean around the floor bolts as well.
Clean the Downpipe
- Scrub if Needed: If the downpipe is visible and dirty, give it a scrub with a brush and some disinfectant. This ensures the entire toilet looks clean and well-maintained.
Handle Fireman Syndrome
- Surrounding Floor and Walls: For households with young children, especially boys with Fireman Syndrome, clean the surrounding floor and walls. Spray disinfectant and wipe these areas thoroughly.
- Mop the Floor: Use a mop with a disinfectant solution to clean the floor around the toilet. This helps remove any splashes and keeps the bathroom hygienic.
Rinse and Finish

Almost at the finishing line now. Rinsing ensures that no cleaning product residues are left behind and that your toilet is ready for use.
Flush the Toilet
- Rinse Away Cleaner: Flush the toilet to rinse away the cleaner and any loosened grime. This leaves the bowl sparkling clean.
- Check for Residue: After flushing, check the bowl for any remaining cleaner. If necessary, flush again to ensure all residue is gone.
Clean the Brush
- Disinfect the Brush: After scrubbing the bowl, place the toilet brush in a container of disinfectant to keep it sanitary. Change the disinfectant solution regularly. (I wish more people did that. From what I’ve seen and heard, it often gets ignored.)
- Dry the Brush: Allow the brush to air dry in its holder. This prevents the growth of bacteria and keeps the brush clean for future use.
Final Wipe-Down
- Check Surfaces: Wipe all surfaces down with clean paper towels to remove any remaining cleaner or disinfectant.
- Replace Supplies: Check the toilet paper and replace any empty rolls. Ensure that any bathroom waste bins are emptied and clean.
Wash Your Hands
- Thorough Hand Wash: After finishing, wash your hands thoroughly with soap and water. (Yep, some may find it surprising that we do this outside COVID-19. Trust me, it is mandatory if you don’t want a visit to A&E, lol.)
Now that you’ve completed your mission Clean Toilet Commode (haha, I know, right) your toilet should be clean, fresh, and ready for use. Bam, you are the hero again.
Regular Maintenance

OK, you’ve cleaned the toilet. But guess what? It will be a mess in no time. What is the solution to having a sparkling toilet all the time? The short answer is attention. Maintaining a clean toilet requires regular attention. Consistent upkeep makes deep cleaning easier and keeps your bathroom hygienic.
Daily Upkeep
- Wipe Down Surfaces: Wiping down the seat, lid, and handle with disinfectant wipes daily prevents the build-up of grime and bacteria.
- Check Supplies: Ensure that there is always enough toilet paper and that the bathroom is tidy.
Weekly Deep Cleaning
- Full Cleaning Routine: Follow the full cleaning routine outlined above weekly. This includes scrubbing the bowl, cleaning the seat and lid, and wiping down the exterior.
- Inspect for Issues: Regularly check for any plumbing issues, such as leaks or blockages, and address them promptly.
Monthly Tasks
- Check the Tank: If necessary, clean the inside of the tank. Mineral deposits can build up and affect the toilet’s performance.
- Deep Clean the Floor: Mop the bathroom floor with a disinfectant solution to keep it hygienic and fresh.
Regular maintenance ensures that your toilet remains clean and functional, making deep cleaning less of a chore.
Green Cleaning Alternatives
I love this bit. Green cleaning alternatives can be just as effective as commercial products for those sensitive to chemicals or looking for eco-friendly options. Many people don’t believe in the power of natural cleaning products. I do. But don’t just take my word for it. Have a go yourself and let me know what happened.
Baking Soda and Vinegar
- Powerful Duo: Baking soda and vinegar create a powerful cleaning solution. Sprinkle baking soda in the bowl, spray with vinegar, and scrub as usual.
- Safe and Natural: These ingredients are environmentally safe and non-toxic, making them ideal for households with children and pets.
Lemon Juice
- Natural Disinfectant: Lemon juice is a natural disinfectant that can be used to clean and freshen the toilet. Squeeze lemon juice around the bowl and scrub with a brush.
- Pleasant Scent: Lemon leaves a pleasant, fresh scent in the bathroom.
Essential Oils
- Add to Cleaners: Add a few drops of essential oils like tea tree, lavender, or eucalyptus to your cleaning solutions for added disinfectant properties and a pleasant fragrance.
- Safe for the Environment: Essential oils are biodegradable and eco-friendly.
Hydrogen Peroxide
- Effective Cleaner: Hydrogen peroxide is a powerful disinfectant. Spray it around the bowl and let it sit for a few minutes before scrubbing.
- Non-Toxic: It’s safe for the environment and doesn’t leave harmful residues.
The two most important things that make me use natural cleaning products are: 1) not harmful to my health, and 2) not harmful to the planet. Using green cleaning alternatives helps reduce environmental impact while keeping your toilet clean and fresh. I like that thought. It makes me sleep like a baby.
I hope this guide has helped you structure your toilet-cleaning efforts. Follow these steps, and your toilet commode will be clean and hygienic. Don’t slack off with regular maintenance; the right products will help you easily tackle this task. All in all, your bathroom will be a more pleasant and healthy space.
Should you decide all of the above is a bit too much, you can always book our domestic cleaning maids to help with the regular maintenance or deep cleans. Worth dropping us a message.