One of The Few Tangible Items You Want to Keep
There are many things we call irreplaceable, but of them all, perhaps old photographs are the most important. Old photos are your only visual link to people and places that belong to the past. You cannot take these pictures again. Because treasured old photos are looked at so often, they are subject to a lot of wear and tear and need a great deal of cleaning and maintenance to keep them going for years to come. This is something you will have to do yourself and cannot expect a cleaning services company to do for you. Cleaning old photos takes just a little time and patience, nothing expensive or complicated is needed.
Prepare for the Photograph Cleaning Process
Before beginning, have a high-quality scan done of the old photos. This will not only be a backup if something should go wrong in the cleaning process, but the digitally stored images will always be available for on-screen viewing when you don't want to disturb the originals.
Here are some basic steps that will help you in most situations:
- Lay a soft clean towel on the work surface you plan to use.
- Put on a pair of soft white (so you can see if they get dirty) lint-free cotton gloves.
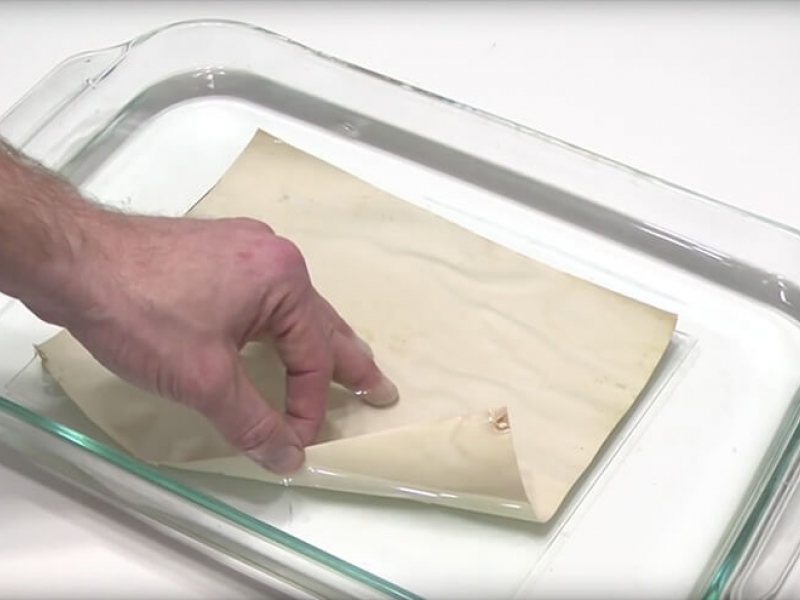
- Hold the photos only by the edges.
- Use a very soft brush to gently brush dirt away from the photo surface. Start in the middle and brush outwards. If you have a can of compressed air, like that used to blow dirt away from computer keyboards, use that after the brushing.
- If there is any adhesive or other residue on the surface of the photos, continue brushing gently to remove as much of it as you can without damaging the photo.
- Now we come to the only specialized material you will need. Ask a photographic supply shop to recommend a good photo cleaning spray or solution because if you use a general domestic cleaning detergent you may damage the photo. Read the instructions carefully and use them to clean any stains and ingrained dirt from the photo. Make sure that you use only the specified material to wipe the pictures.
- If there is any slight residual dampness, allow the photos to air dry and once that is done, store them in a way that ensures that while they can be seen, they are protected.
- If you find that there are marks or stains on the old photos that you are unable to remove, do not try and experiment yourself, you could end up destroying the photos. Ask a professional photographer for help.
- You could also try scanning the photos and using photo editing software to clean up the marks and then printing out new copies.
How to Clean Photos Submerged in Muddy Water
- Use lukewarm water at 20 to 30 degrees Celsius. Water warmer than 30 degrees Celsius may dissolve the emulsion on the photo surface and damage the image. Make sure the water is below 30 degrees Celsius before beginning the cleaning process. You can also use room-temperature water. If the water temperature is lower you can avoid dissolving the emulsion but it may take longer to remove the dirt on the surface. We also recommend that you avoid cleaning in running water and work in still lukewarm water. If the image surface of a photo is severely damaged washing it off with the force of running water will tear off the image.
- When handling the photo touch the back or hold it by the edges. If you squeeze the front image surface with force, the image may also peel off with the dirt.
- If the attached dirt is completely dry gently brush it away using a soft brush. If you scratch it forcefully with a hard brush part of the image may peel off.
- If you don’t have a soft brush or if the dirt isn’t dry and remains damp do not forcibly remove the dirt. Proceed to the step of soaking the photo in water. Gently soak the print in lukewarm water.
- After soaking for 30 seconds to 1 minute you can begin the cleaning step.
- Now you move on to the cleaning process. Hold the edge of the photo and gently squish in the lukewarm water. When removing dirt be sure to start at the outside corners of the photo to see if the dirt if the dirt can be removed without peeling off the image. Use the tip of your finger to gently wipe or tap to remove dirt.
- Depending on the condition you can hold the edges of the photo and carefully wipe it to remove the dirt. Don’t wipe too hard with your fingertips as you peel the image off. Remove the dirt as carefully and as gently as possible. If the image surface is not damaged dirt can be washed away. When the dirt is removed the surface of the photo will be smooth to the touch. Once the image appears intact gradually move toward the centre as you perform the same procedure.
- If the image surface is damaged it will feel slippery on the fingertips. In such cases regardless of how gently you wipe the photo the image surface will gradually peel away causing red and yellow stains. In some severe cases, the image itself is lost. Colours that come off of the photo may stick to your fingertips.
- In such cases, we recommend that you do not forcibly remove the dirt and immediately remove the photo from the water.
- Use your fingertips to remove dirt from the back of the photo. A brush may be more efficient than your finger when cleaning the back.
- Once the dirt has been removed from the front and back of the photo take it out of the water and rinse it with clean lukewarm water or cool water.
- Once the cleaning is done the photos are ready to dry. Hang the photos by their edges or lay them flat on a newspaper or other paper in the shade where dust will not settle on the photo. Avoid drying in direct sunlight as it causes discolouration and can also the prints to curl up.
- You can use a hair dryer but be sure it is on a low setting to avoid rapid drying.
Removing and Cleaning Printed Photo Stuck to Glass

- First of all, you will need de-ionised water when cleaning and restoring prints. It contains less minerals as it has been further filtered. Household filtration systems contain minerals that can leave stains on your prints.
- Before submerging the print in water you should test it. Take a Q-tip, dip it in water and apply a small amount to the corner. Rub carefully. If the emulsion appears to be intact with no deterioration, submerge it in the de-ionised water. Gently agitate the print by rolling it back and forth. This allows the paper to become saturated with water much more quickly than just simply soaking it. You will notice how the paper reacts to the water.
- After you have agitated the print over the course of 20 to 30 minutes it all appears to be well flip the print over and it tends to get all the air from between the glass and the paper to further saturate the print. Take your fingers and gently go across the back of the print, over all the creases gently pushing the air bubbles outside.
- Once all the air bubbles have been removed let the print soak for approximately 1 hour. After an hour you can test the print to see if it will release from the glass on its own. Do this by applying a small amount of tension holding up the print. If the print is not released from the glass on its own, do not pull as you you will rip the emulsion.
- Because of the possible age of the print, you can use a razor blade to help remove out from the glass. Soaking it in water over a long duration of time could cause the emulsion to deteriorate. When using a razor blade it is very important not to cut the print. You are simply using the razor blade to push the print away from the glass.
- Apply a small amount of tension pulling the print away from the glass using the razor blade. You will find some areas come apart very easily without the need for a razor blade.
- If you get to an area that will not release itself from the glass using the razor blade the tension with your fingers, re-soak the print. This is usually done in increments of about 30 minutes. Then come back and re-test.
- You need to know that you are not cutting the print with the razor blade. You are simply using it to pry the print away from the glass, pushing a small amount of information while pulling on the print. The razor blade simply glides down - you should not apply any amount of pressure to do this.
- Once the print is fully saturated it should release from the glass. Once you have the print away from the glass, put it back in the de-ionised water and use your hands to gently rub the dirt away from the surface. Do not apply too much pressure or you will hurt the emulsion of the print.

After you have removed all the dirt from the print, hang it and let it dry. Usually, it takes 3 to 4 days to get the print perfectly flat if the proper amount of pressure has been applied. You can use a photographic press to put the prints in to flatten them out. You can also use a book by putting weights on the top and leaving it for an extended duration. If you don't know where to get a photographic press, our friends at Wex Photo Video London (where we provide our daily office cleaning service)
OK, you can also use some off-the-shelf ready-made solutions like photo cleaning wipes. They will help with cleaning fungus and mildew from old photos and cleaning sticky photos but are not a viable solution for cleaning damaged photographs. Please use it at your own risk as all situations and conditions differ from one another.
I hope you enjoyed this article and have managed to clean up and restore your old family archived photographs.